Channels Power Tool – Optimize and speed up your workflow
A powerful and versatile tool for your workflow in Photoshop, developed by Giuliana Abbiati.
Easily get a preview of all available channels. Create and load masks from the channels. Use available masks and the powerful Apply Image option to precisely recover the details of your file to enhance your color control precision and productivity.

Ultra fast Channel and Mask Preview, Customizable Apply Image Options, Fake-K and HSB Channel (Hue, Saturation, Brightness), for full control of your corrections. Open and edit curves and blur the masks directly from the panel; your workflow will be faster and efficient.
- Easily get a preview of all available channels.RGB, CMYK, Lab, HSB, plus fake K 80%
- Use available masks and Apply Image to precisely recover the details of your file 70%
- Open and edit curves and blur the masks directly from the panel 60%
Vat added to EU customers only

Compatibility, version and user manual
Single user license on two different computers.
Photoshop CS5 and later to CC 2019
Not compatible with PS CC 2020, sorry
Mac: OSX6 Snow Leopard and later
WIN: WindowXP and later
Current version: 1.1.6
Download user manual
Why Channels Power Tools
What to know first
Channels Power Tool is, as the name says, a very powerful tool. It allows us to work with Photoshop channels at unbelievable speed and with unseen control and it takes a step ahead of the usability of one of the essential ingredients of every image: the channels. This introductory section is aimed to introduce the characters we’re working with on a daily basis (whether you know it or not) and some concepts that can be an ace in lots of situations.
What Photoshop Channels are.
Within Photoshop we can find several kinds of channels, but we will deal only with color channels, that compose our image (Grayscale, RGB, Lab, CMYK, HSBcreate usually), and alpha channels. Channels Power Tool uses these channels to create a selection.
We can give a brief definition of a channel as “The representation of a selection in grayscale.“
“The keyword here is “representation.” Everyone knows how useful a selection is, maybe what is not so clear is that Photoshop gives us several ways to visualize (and therefore modify it). We are used to visualizing a selection with the so-called “marching ants” or maybe in Quick Mask mode. But it is also possible to visualize a selection as a grayscale image, like every time we use a layer mask.
Channels work exactly in this way: they show with a different shade of gray if a given pixel is selected, and how much. In RGB an entirely white pixel (when we look at a particular channel) means “this pixel is (totally) selected,“ while a pitch black pixel means “this pixel is (totally) not selected.
Guess what a medium gray means? Let’s try with an example: create an RGB file and manually paint the R (Red) channel completely white, then paint G (Green) and B (Blue) pitch black. How our file is going to be? Exactly, pure red. The values of our channels will be R=255, G=0, B=0. Doing this we ask Photoshop that we want only and comprehensively select the red component of the file.
Let’s take a more common example: a landscape with a blue sky on a bright sunny day. Try to visualize how channels will be in the sky area. Blue ill be, for sure, the brightest channel, Red the darkest and Green would be somewhere in the middle. Learn how to take advantage of the inner election hidden in every channel means we can obtain extremely complex selection, pixel precise and really with no effort.
At the very beginning, it’s hard to pre-visualize the structure of each channel, and you need to check them one by one toggling the visibility in the Channels panel. Here it comes CPT, which lets you, with literally just one click, see the structure of each channel at a glance. Not only in RGB or the color mode you are using, but in all three main Photoshop color modes (RGB, Lab, and CMYK) at the same time.
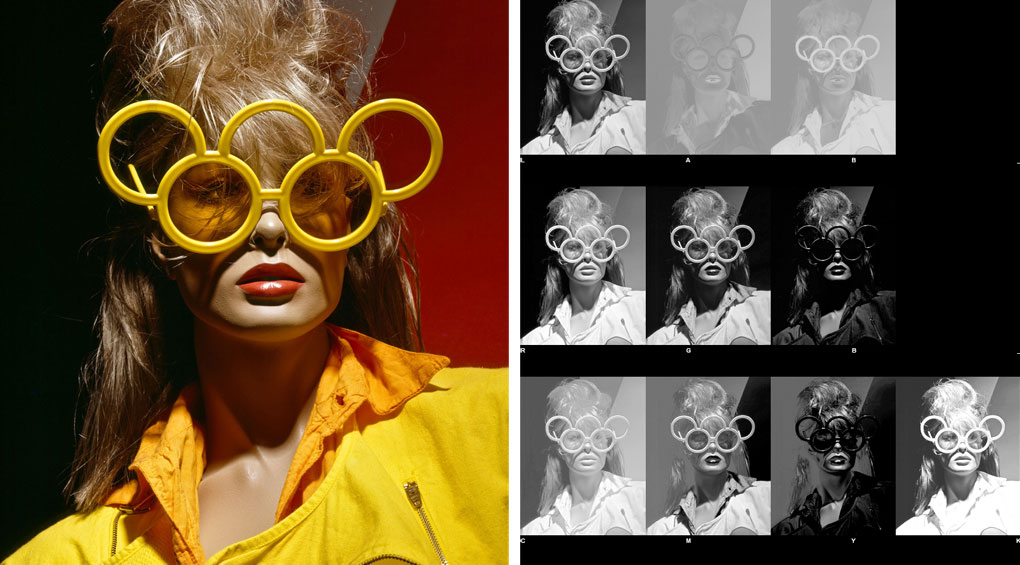
Get on the fly the preview of all available Channels un-depending from the color mode of your file, include HSB (Hue, Saturation, Brightness), no longer available in Photoshop.
Open the next toggle to read more.
Apply Image
Image>Apply image is one of older Photoshop functions and let us copy-paste channels or layers (our source) on channels, summon players or layer masks (our destination). You can change the opacity of the source you’re applying its blending mode or you can also mask it choosing a channel.
The Apply button of Channels Power Tool summons this function that, for unknown reason, doesn’t have a default shortcut. Apply image works also between different files, and in the likely case the file has multiple layers (the most common situation), it allows to make to choose which layer should be the source. The only condition that Apply Image requires to be used between different files is that these must be opened at the same time in Photoshop and share exactly the same size (in pixel) of width and height.
What is GCR and how it can be useful to you.
GCR means Grey Component Replacement.
This concept works in CMYK color mode, where we can obtain the same color in different ways using different values combinations for the four primaries. Everything became clear if we consider a color composed of various elements, dealing with luminosity, tint, and saturation. Luminosity is the equivalent of the gray strength of a color: how much dark or bright we perceive this color.
We can have two colors with the same tint and saturation (i.e. a particular red) but different luminosity. Let’s call them a dark red and bright red for ease sake. What distinguishes them is the luminosity. In CMYK we have the theoretical possibility to obtain a gray in two distinct ways: blending proper quantities of CMY or using just the K.
This can take to a lot of issues in we are going to print in offset, but in our hypothetical example let’s imagine things work in a perfect, mathematical way. Let’s say we want to obtain a medium gray. In RGB we would only have R=128 G=128 B=128. In CMYK (considering a Coated FOGRA39 profile) we can reach this result in (at least) two different ways: with just a K=50, meaning we have C=0 M=0 Y=0 K=50, or leaving K=0 and using only CMY components like this: C=58 M=48 Y=47 K=0. Now we got lots of different possible combinations, adding a little K and subtracting CMY in a right proportion. This is exactly GCR: how we transform our gray component when converting to CMYK. A low GCR will use a lot of CMY and small K (K will be lighter), a high GCR will use a lot of K and less CMY (K will be darker) while a medium GCR will be something in the middle.
This explanation leaves a lot of dark areas in explaining this concept, but nonetheless, let us understand how a custom GCR could be useful: to obtain a K darker or lighter, that we can use as a mask, a selection or anything we could think about.
Channels Power Tool | Screencast By Giuliana Abbiati
1. Channels Power Tools Overview
Presentation
- How to open the panel, dock and undock
- Increase of speed, quality, and productivity
- Work color modes: RGB, Lab, CMYK
Overview of features:
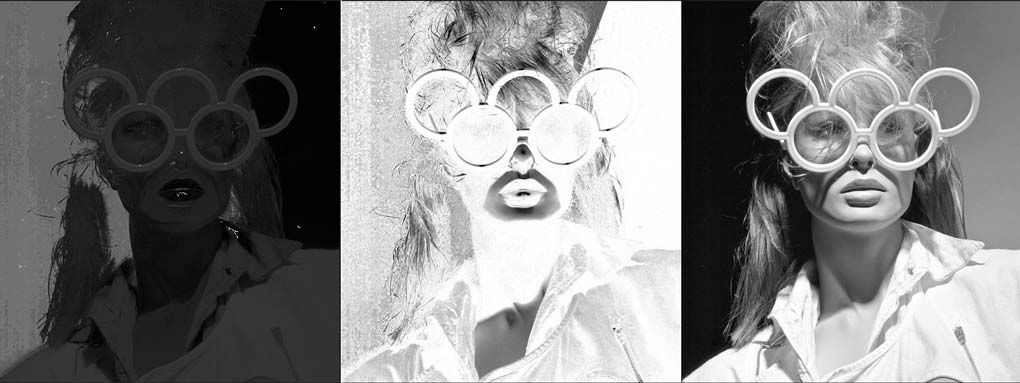
- Evaluate, choose and edit the most appropriate mask
- Evaluate all the channels of your files with one click
- Live channels preview.
- Load the channels in the same file or duplicate.
- Load in your document a particular channel as an alpha channel.
- Apply or Blend a single channel into a layer mask, an empty channel or a layer.
2. A Detailed Description of Channels Power Tool
Introduction:
- How to open, expand, collapse, dock and undock the panel.
- Know your enemy to win the war.
- Analyze your file, his weaknesses, and strengths, browsing his channels.
Channels Preview.
- Check the file channels at full screen using the radio buttons.
- Check the destination of your loaded channel and apply it.
- Speed and performance with large files.
Generate Preview
- Generate a preview document with ten channels with one click.
- Evaluate density and structure of different channels.
Load Channels
- Load any channel as an alpha channel.
- Load them un-dependently from the file color mode. CPT will convert them preserving their appearance.
- Use the calculation command to create elaborate masks.
- Use the option “state before load.”
- Load all the channels in a breeze.
- Load channels on the original or duplicate option.
- Delete all them just clicking on the trash button.
Apply a Channel
- Apply, change opacity or blending mode with the powerful apply image option. In seconds instead of minutes.
- Try different option adding new masks or replacing the previous.
Channels Loaded and Alpha Channels
- Manage alpha channels to create selections.
- Trash with one click all the alpha channels or only those set up with CPT.
Quick access to other functions.
- Stamp on top
- Gaussian Blur
- Add or edit a curve
- Adjust curve edit button with a large floating window.
- Edit a curve adjustment layer.
- Fake k, editing the GCR.