
When my dear friend and co-blogger Giuliana Abbiati coded a free Photoshop CS5 extension called “False Profiles” I suggested her to add some quick and dirt illustrated examples; then we started wondering that false profiles are a simple yet powerful tool, which may require more than a couple of pictures.
Actually, the toolset is easy to use but the theory behind it is quite deep: Dan Margulis originally invented this technique some 10 years ago, and in his book “Professional Photoshop” 5th edition he gives the background to understand all the subtleties that may follow, plus some extra +450 pages worth of reading. There’s also an article (from Electronic Publishing magazine) he wrote on the subject that you may read online. I leave to Marco Olivotto the honour to divulgate/elaborate the theory better than I can, for he’s the actual teacher of the group.
I’ll simply show here some application of False Profiles for tonal corrections, combined with the recent add of the masked Multiply step (sounds like a super-hero): it’s used to equalize the luminosity of pictures that contain at the same time very bright and dark areas, and/or to recover detail in there.
I’ll be using pictures from a soon to be released Roberto Bigano’s photographic book called Plastic Girls; all the files are tagged sRGB so this will be the reference ICC throughout the post.
You can download the free Photoshop extension here, where Giuliana approaches the theory as well: I suggest you to read it.
1. False Profile in a nutshell
False Profiles (FP) are – not only, but also – a way to lighten or darken a picture, without actually changing pixel values – only their interpretation. Let me explain briefly.
 If I show you a middle gray board, it’s… middle gray.
If I add a “White board” writing on it you may think “Uh, quite dark to be a white board”.
On the contrary, if the writing says “Black board” you will think “Uhm, it’s too light to be a black board”.
You see, feelings depend on your expectations.
Back to pictures: if an image is tagged with an sRGB profile (which has a gamma approx of 2.2), it’s… that image.
If I tag that image (Assign Profile) with a custom made sRGB profile with a modified gamma of 3.0 you will perceive it as quite dark.
If I tag (Assign Profile) with a custom made sRGB profile with a modified gamma of 1.4 you will perceive it as quite bright.
It’s the very same original image, pixels didn’t change, but the way Photoshop displays them changes.
”” (Fig. 1) Different gamma compared, original in the center
The whole story is a bit more elaborate than this and it involves also color primaries, but this will suffice in order for you to follow the examples. Download the free extension, which automatically installs all the needed false ICC profiles, and get ready.
(Doubts? Read Giuliana’s post. Read Dan Margulis original article about False Profiles. Read Charles Poynton famous Gamma FAQ. Read Dan Margulis’ Professional Photoshop. Subscribe to ColorTheory group and ask the Maestro).
2. The False Profiles technique
A straight application of the False Profile (FP) idea: use a FP to brighten a dark picture (Fig. 2).

Fig. 2) Original picture (left, too dark) and the application of a false profile (right, gamma 1.5)
The steps to follow:
- Assign a gamma 1.5 profile (pixels don’t change, only the way they’re displayed) clicking on Giuliana’s extension. Try different gamma, and pick up the one which gives you the more visually correct look.
- Convert to Profile (in Photoshop from the menu Edit – Convert to Profile…) back to sRGB. Remember to add this convertion step! This way the pixels are finally changed to their final value. You don’t want to give someone else (like a photolab, a printer) pictures tagged with a weird gamma profile, believe me.
So, Assign makes the picture look different just because it differently interprets the data; it’s up to Convert writes down the correct numbers on a “standard” profile.
3. The Multiply technique
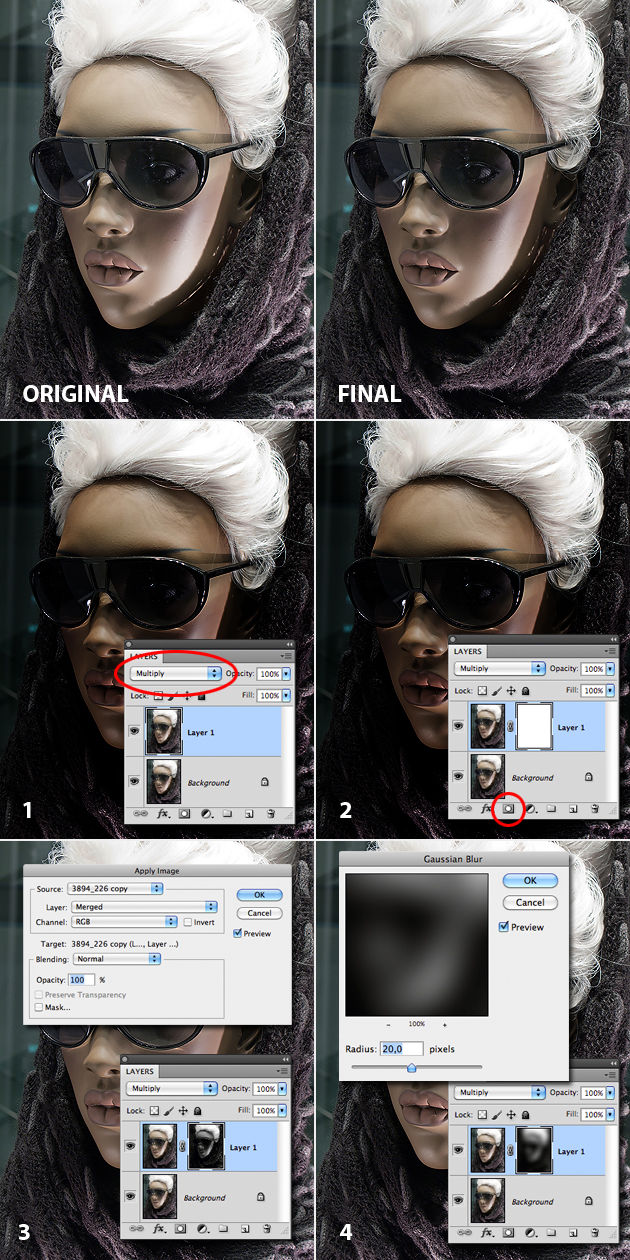
Now let’s see the Multiplication (or Multiply) only in action. We need a picture with some critical highlight detail that we’d like to enhance (Fig. 3) You see in the first line the original and the final result, plus all the details to get there.

(Fig. 3) Standard multiplication steps explained in detail (no use of False Profiles
Let’s review this time only all the necessary steps of the Multiplication
- Duplicate the background layer and set its blending mode to Multiply.
- Add a layer mask, clicking the appropriate icon in the layer palette.
- Apply the RGB composite to it, with the Image – Apply Image command (we’ll use different channels later on).
- Run a Gaussian Blur filter to the layer mask (here 20px, it may be larger if you work with high res pictures).
- Optional: flatten and save.
If you notice, the highlight detail is enhanced. Setting a layer to the Multiply makes the picture darker (Multiply blending mode explained here), while adding a so-called luminosity mask as the layer mask means: please Photoshop, let the darkening to affect mostly the light areas of the picture, and quite less all the rest, almost nothing in the shadows. Mind you, any mask applied to a layer that changes dramatically the luminosity of what lies below it, must be blurred in order to increase the contrast (funny, try it), so here’s the why of step 4.

Variations on the Multiply theme
As a suggestion, instead of duplicating the background layer you can use a straight, unmodified Curves or Levels Adjustment Layer set to Multiply: it’s exactly the same.
And if you feel the effect may be stronger (i.e. more darkening needed) duplicate the multiply layer one more time, or as many time as you need. You can keep the layer mask, or as a slight variation clip the extra multiply layers on the first one (ALT+click in between the layers); or just keep duplicating Multiply layers, merge on the top the result (Command + Option + Shift + E on a Mac, CTRL + ALT + Shift + E on a PC) and apply to this single layer the mask that you like, trashing all the Multiply layers below. It doesn’t make a dramatic difference – except for the use of Adjustment Layers to keep the file size small. It’s quite easy to give each option a try and use the one that we like the most.
4. Multiply + False Profile combined
So far we’ve seen that a False Profile can lighten a picture in a peculiar way, while the Multiplication step will make it selectively darker. What if we mix the two?

(Fig. 4) False Profile G1.8 plus three Multiply steps luminosity masked
What happens is that the picture’s tonal values get “equalized”: the three Multiplication layers alone make the picture too dark, even in the highlight that we’d like to recover. But highlight and shadow’s values get closer, so that a False Profile G1.8 can resuscitate the whole picture and the net result is more detail in both of the face’s sides. The exact order doesn’t matter too much, you can either:
- Duplicate the background layer, set it to Multiply and apply the RGB composite (aka Luminosity mask) as a layer mask, then duplicate this layer two more times
- Assign to the document a G1.8 profile
Or the reverse (Assign, Multiply). Merge on a separate layer with the usual shortcut (Command + Option + Shift + E on a Mac, CTRL + ALT + Shift + E on a PC) trashing the Multiply layers or simply flatten the result. Then Convert to Profile back to sRGB or the one of your choice.
“High Gamma profile + Screen layer” will.
No it doesn’t. If you don’t believe me try it yourself.
The why isn’t obvious, and lies in the different kind of darkening/lightening that a gamma curve and Multiply/Screen blending modes apply. If you’re interested in the details, stay tuned for a RBGblog post will appear in the near future.
5. Mask options
In the last example as a layer mask I’ve used a luminosity mask, a blend of all three channels (see Fig. 3, last row). Actually, it’s really important to pick up the more appropriate channel, and from the more appropriate layer in order to tailor the effect to our needs.
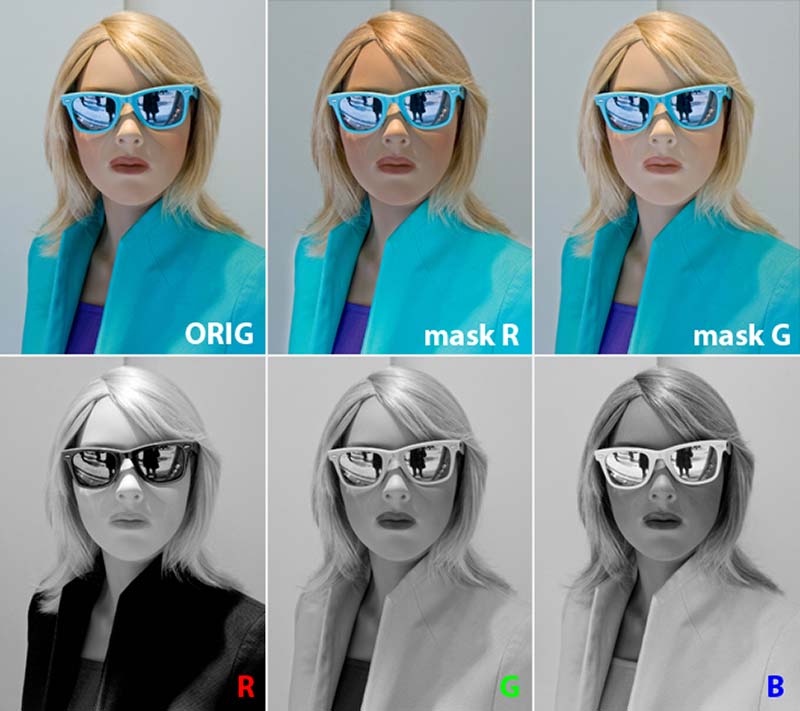
(Fig. 5) First row: Original and False Profile G1.5 with two Multiply layers, masked with R channel or G channel. Second row, the R, G, B channels of the Original
As you see, the one masked with the R channel is lighter in the cyan jacket, for there the R channel is pitch black, while the face gets darker. The picture is more balanced using the G channel as a mask.
””Not only the used channel is important, but also the source of the channel. In the box at left you see that it’s possible to choose between “Merged” and “Background” (plus all the existing layers, to which we don’t care). Being the Multiply layer darkening the picture, a channel of a merged version will be darker, and the Multiply effect weaker. On the contrary, a channel from the Background will be lighter, and the Multiply effect stronger. So, choosing from the Merged version leads to a lighter result (dark channel = less Multiply), while from the Background to a darker result (light channel = more Multiply). It may be a subtle effect, nonetheless if you start piling Multiply layers it becomes quite evident.
(Fig 5.1) Original in the center; left, lighter version (G 1.5, double Multiply layer masked with the B channel from the Merged version). Right, the same but with the mask coming from the Background.
6. More examples
Now that you master the principles, let’s play with Roberto’s images and see if we can apply the False Profile / Multiply technique proficiently.
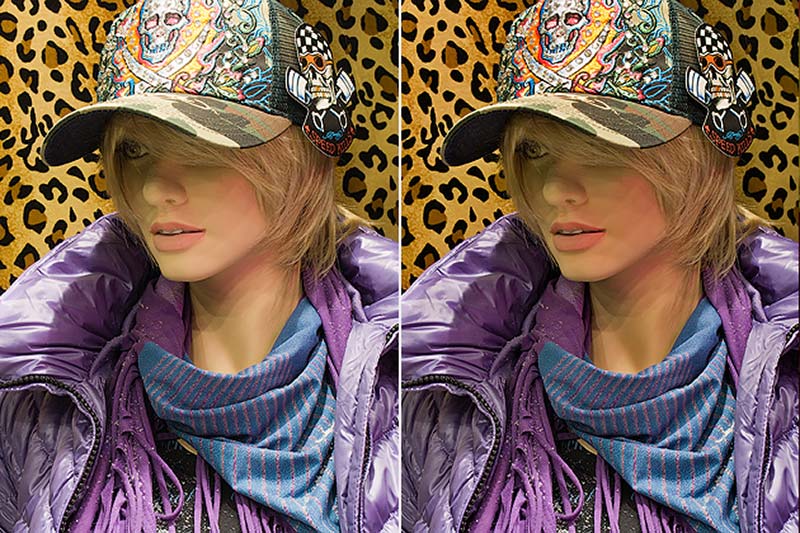
(Fig 6.1) False Profile G1.8, triple Multiply (L-masked)
You see in Fig 6.1 that the multiply, in RGB, leads to moderate color saturation (here in the face), plus the usual boosted detail especially in the hat and the fabric.
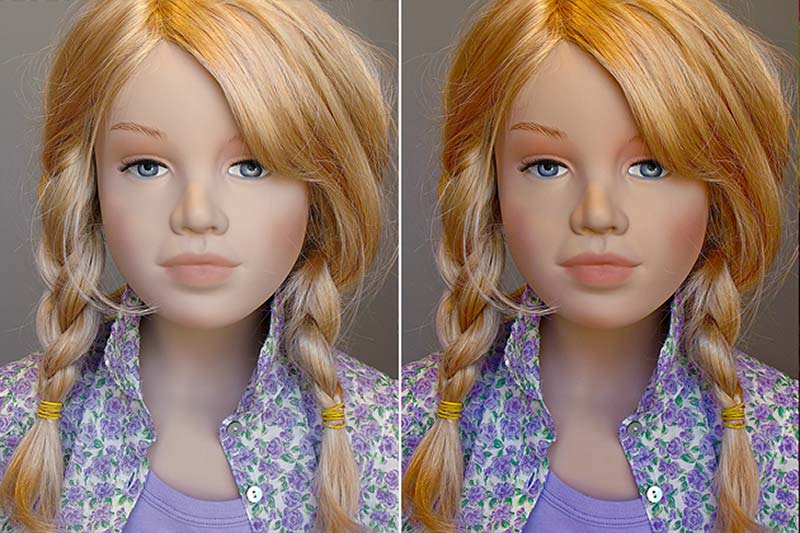
(Fig 6.2) False Profile G1.8, Lab conversion and single Multiply layer L-masked while still in Lab mode
In Fig 6.2 I assigned a false profile G1.8, then I converted to Lab (Image – Mode – Lab). In Lab the Multiplication leads not only to an overall darkening, it also oversaturates the colors (dont’ ask me why, but a and b channels of Lab gets overlaid when the layer is multiplied). So I did the usual Multiply layer, masked with L from the background, in order to get a darker version. Blur the mask, convert to sRGB.

(Fig. 6.3) False Profile G1.8 and a double Multiply layer masked with R
Fig. 6.3 shows why choosing the right channel for the mask is important – the R, being light in the dress, makes the multiplication more effective just right there.
Well, being Roberto’s Plastic Girls pictures so refined, I guess the correction I’ve shown here are quite subtle: nevertheless the technique is powerful and this is just a showcase of some of the possibilities.
Happy photoshopping, and download Giuly’s False Profiles free Photoshop CS5 panel!
Davide Barranca

Plastic Girls 1978-2010 is a photographic project by Roberto Bigano.
I have been shooting “Plastic Girls” for over thirty years. They fascinate me and I find they tell a lot about the culture of a country and the evolution of fashion and style.
According to a friend of mine, Beppe Maghenzani, I am an hermeneutic, Greek word difficult to translate but, in my case, means that every photo I take is complete in itself and holds myself in its entirety as well as the fact that I continue to work on this subject, forever.
It is very important to clarify that all mannequins, without exception, were photographed in the stores windows always through the glass and never with special permits. All these wonders are right there, available to anyone who has ability to see them.
Another thing that has always amazed me is the ability of window display stylists, not only to set up the store windows, but also to light, often in extraordinary ways, the objects.
I think every photographer has a lot to learn from them.