Two suggestion for ALCE processing of equirectangular images to be used building 360 degree panoramas.
Equirectangular images, the ones used to build those beautiful, immersive, 360 degrees panoramas, may require some extra attention with ALCE , in order to avoid processing differences near the image’s borders: which must blend seamlessly in the final file.
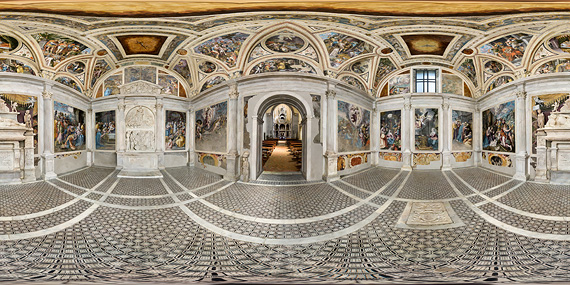
The italian photographer Alfonso Grotta has kindly given me the permission to use this wonderful image (part of a virtual tour he did over the past 3 years to document the Somma chapel restoration, in the San Giovanni a Carbonara church in Naples, Italy) to show a suggested workflow.
An equirectangular image is a stitch of several single shots, that covers 360° horizontally (a full circle), and 180° vertically (top to bottom). In the resulting panorama (a quicktime/flash/html movie) the image is wrapped around a sphere, so that the top and bottom lines of the borders are condensed into a single point (zenit and nadir) and the left and right borders touch themselves in a meridian. A true equirectangular file must have the exact 1:2 ratio(e.g. 1000 x 2000 px), not a pixel more, not a pixel less. To be successful with ALCE in your 360° panoramas, you should follow just a couple of simple suggestions.
Avoid the Turbo
 First, you should not select the Turbo processing: while it’s perfectly fine (and a lot faster) for normal, single images, it’s not recommended with equirectangular files.
It builds the local mask (used by the routine to boost the contrast) in a way that doesn’t fit well with the image’s subsequent processing (i.e. the VR movie).
Offset
If you keep having troubles with the left/right borders after ALCE, please try the following: (I suppose you have a flat, single layer, equirectangular image in Photoshop and you know its width in pixels – check it from the Image – Image Size... menu).
- Duplicate the layer (rename it as SHIFTED)
- Run the Filters – Other – Offset…
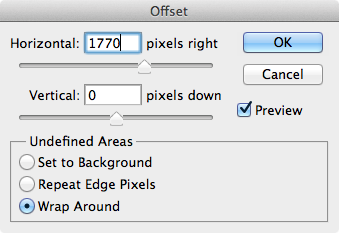
- Apply an Horizontal offset to the right using as a value the half of the image width in pixels, keeping “Wrap around” as the Undefined Areas option.

Photoshop filter Offset, first iteration with positive value
For instance if your image is 3500px wide, offset it by 3500/2 = 1750 pixels. Don’t worry if the width is odd (for instance 3543 pixels): pick up either 3543/2 = (1770 or 1771), it’s not a problem at all, but write down the value somewhere. You’ll see that the whole image is… offset on the right (compare it with the one at the post start).

Result of the Offset filter (180 shift in the Yaw)
- Apply ALCE with your chosen radius to the SHIFTED layer (just keep it visible and run ALCE).
- ALCE will create a processed layer: rename it “BORDERS” and run again on it the Filters-Other-Offset… with a negative Horizontal offset value: if previously you’ve used +1770, now choose -1770 to shift the layer back to its original yaw.
- Trash the (now useless) SHIFTED layer, and switch off the visibility of the BORDERS layer.
- Run ALCE again with the very same radius on the background (original, un-shifted) layer.
- Trash the (now useless) background layer and rename the newly processed layer as CENTER.
We’re almost done, but to recap: we’ve offset to the right a copy of a layer, processed it with ALCE and offset it back to left. Then we’ve applied ALCE to the original layer. The unprocessed layers have gone to the trash.
- Add a layer mask to the upper, BORDERS layer (click the Layer Mask icon in the layer palette, or select the layer and Layer – Layer Mask – Reveal All).
- Select the Gradient Tool from the tools palette, Reflected Gradient as the option in the upper option bar, black and white the colors.
- With the layer mask active (it shows a little stroke in the icon’s corners), click and drag from the center all the way through the right, releasing the mouse a little bit before the border. You’ll end up with a layer mask like this one:
 The Layer mask for the BORDERS layer[/caption]
 Now your Layers palette should look like the image at the left: if it doesn’t, please review the steps above. You can now flatten the file and save it.
Actually, painting a couple of large, soft brush strokes with white in the layer mask would have been enough, nevertheless the mirrored gradient is… much more elegant, don’t you agree?
That’s it, I hope you’ve found this little trick useful – it can be used not only for ALCE, but also with all kind of elaborations that may give edge troubles with equirectangular images.
I wish to thank again the photographer Alfonso Grotta for the kind permission to use his picture. If you’re interested in the San Giovanni a Carbonara church virtual reality tour he made (and high resolution stills to document the restoration), it’s included in the companion CD of a dedicated book.
Davide Barranca
Lives and works near Bologna, Italy.
He’s the developer of ALCE, VitaminBW, Double USM, PS Projects and Floating Adjustments.
Davide is also a color-management aware photo-retoucher, focused in color-correction and image enhancement in fine-art photography, art reproduction photography and fine-art digital printing. Interested in academic research around digital imaging, stitching, HDRI, custom filters writing.
Specialties: Pre-press, broad experience in working side by side with photographers trying to convert from artist to technical language.
You can visit his site here >


