Frequency Separation Made Easy
To put it as easily as possible, frequency separation is a Photoshop technique which separates the texture of an image from its shape creating two layers, one storing color and luminosity information and the other one, storing the detail. Activating a curve adjustment layer, restricted to operate on the high-frequency layer, you can change the detail level of the image by steepening or flattening the curve. You will also be able to easily clone over defective parts with no visible side-effects. Frequency Separation Made Easy.

What is Frequency Separation
We should call this technique Spatial Frequency Separation because it affects space, not time. For a practical reason, we’ll call it just Frequency Separation.
Usually one encounters frequency separation for the first time in the field of beauty retouch. Here how it works.
With a relatively complex routine, the user manually creates in Photoshop two layers. The first one, called “Low Frequency,” looks like a blurred version of the image stores the shape and the color information. The second one, called “High Frequency” is a flat, grayish thing with basically no contrast but have a lot of the detail. The two layers are grouped. Usually, this is called “Pyramid, ” and the two layers together give the same result of the original.
In the main image above you may see the detail on a high-frequency layer rich in detail and the pyramid (group) of layers.

Original

Low frequency blurred layer

High frequency layer
The benefits of Frequency Separation
We just learned that the stack of the two layers gives the same result of the original. So, why create this two layers? Well! For many reasons.
1. You may clone on the high-frequency layer to get rid of wrinkles and slight skin imperfections.
2. You may select parts of the low-frequency layer and blur them to get rid of blemishes, skin redness or unpleasant reflections on the skin.
3. Adding a curve adjustment layer, set in luminosity blending mode, with the middle point on 128 and restricted to operate on the high-frequency layer, you may change the detail level of the image by steepening or flattening the curve. This may be done locally using a layer mask.

Original

Flat curve clipped to the High Frequency layer: blurred

Steep curve applied on the High Frequency layer: sharper
The Limits of This Conventional Use of Frequency Separation
This is how in 90% of cases Frequency Separation technique is used. To us, there are many limitations.
1. The two layers must be created on one particular frequency band that may work properly in some parts of the image and not on others.
2. This powerful technique is virtually used in the field of beauty retouch only, but it’s much, much more versatile.
3. You may duplicate the routine using different frequency bands, but it’s complex and time demanding.
4. This workflow requires a lot of time.
5. It’s great to remove imperfections, but not to add sharpness and local contrast on different frequency bands. In other words, it’s complicated to boost and cut detail at the same time, that it’s where this technique should excel.
6. It’s not used to add a unique mood to images.
A Different Approach. Frequency Separation With Sliders
Given the potential of Frequency Separation, we wondered if it was possible to get more out of this technique, working on different bands covering from higher to lower frequencies, while reducing the amount of work required through a live preview and a partial automatization. After a year of hard work by our developers, the answer was this plugin for Photoshop.
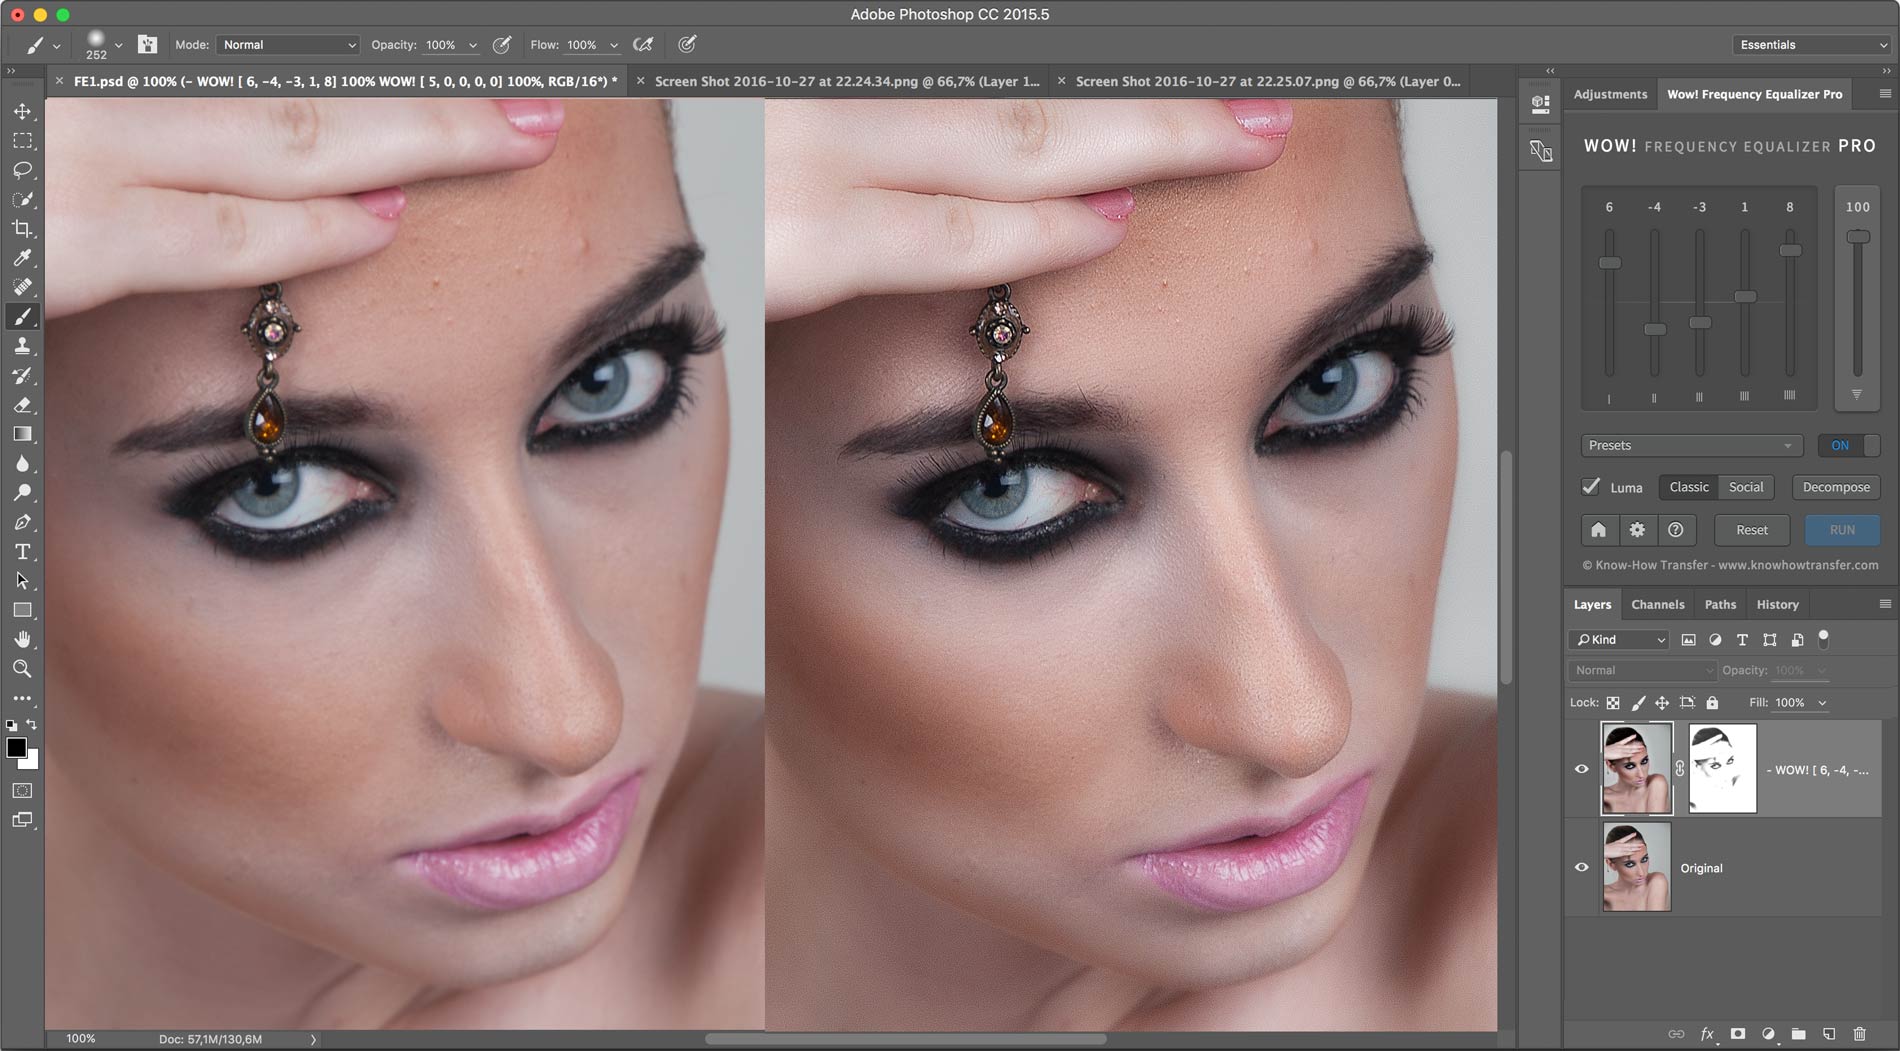
Wow! Frequency Equalizer does just that: under the hood, it decomposes your image in five different frequency bands and allows you to adjust them individually, exactly as described in the page and video, but there are four more frequencies available. But where the decomposed layers are? Well, they’re hidden: you actually manipulate them using the sliders. A boost (upward) corresponds to an enhancement of a given band, a cut (downward) corresponds to a reduction.
The sliders correspond to five spatial frequency bands; left to right, the high frequencies which become progressively lower. If you prefer: detail is on the left, shape is on the right. The intermediate bands work on intermediate scales. Wow! adds style, image sharpness and three-dimensionality together with incredibly smooth transitions.
Here below and example of Frequency Equalizer applied in one go. It took three minutes to compare more versions and apply, using Mask Equalizer, a mask to partially protect the shadows. No retouch! As you may notice, even if some imperfections remain, there is and important overall improvement. Skin and gradations, in general, are much more pleasant with no fake effect. Despite this smoothness, the image is more brilliant and sharp where needed.
Stay in touch or sign up The next posts will be focused on frequency separation and retouch with sliders, frequency separation with sliders and decompose, and frequency decomposing with landscape photography. Don’t miss them.
Read More On This Topic

What’s new in Wow! Frequency Equalizer Pro Vs Classic
Wow! Classic works on five different frequency layers, but where are they? Well, they’re hidden: you actually manipulate them with the sliders, but there’s nothing else you can do. Wow! Pro adds the option to turn each frequency into its own pixel layers. You can paint, clone and heal on the very exact frequency layer that contains the features you need to target, with great precision, giving you unprecedented control over the retouching process.

Spatial Frequency Separation in Theory
Usually one encounters spatial frequency separation for the first time in the field of beauty retouch. To put it as easily as possible, it is a technique which separates the texture of an image from its shape, allowing the retoucher to easily clone over defective parts with no visible side-effects.
Hello Chris
This the Frequency separation and Wow! Tutorial page
https://www.knowhowtransfer.com/photoshop-professional-plugins/wow-frequency-equalizer/tutorials/
You can also find useful info by downloading the user manual
https://www.knowhowtransfer.com/download/WOW_Pro_manual.pdf
Great tutorial.
The sliders approach seems much more effective.